There's an "organic" version of this post at on Google Docs which may receive some edits over time. But I also wanted to reach a broader audience.
Many of you reading this document will be either:
We’ll try and signpost items that might be of especial relevance to one group or the other, but a lot of this advice will be relevant to everyone.
I (Michael Newton) started this document as a response to several queries I’ve had about home working in the light of the CoVid19 pandemic. I’ve been working from home for years, and helping home educate our son at the same time.
I’m currently working with NoRedInk where about half of our workforce is normally remote (we call them the “Remotians”) - but since Friday we’ve moved to fully remote working for the duration of the current events. We have a history of remote working that goes back to soon after the company was founded, and forced ourselves to get it right by hiring two remote VPs into the senior leadership team.
This document is partly being created to help and support the NoRedInkers who have had to unexpectedly become Remotians overnight, and partly a place for the Remotians among us to share what we’ve learned over the years.
Anyone with a NoRedInk email address can request editing access to this document, and it contains the collective wisdom of a group of people. That means you’ll get a variety of views and approaches below. Also NRIers: that means don’t post all the company internal secrets here or I’ll be in lots of trouble 😅.
You are doing remote working on hard mode. Most people who start remote working have time to prepare, to think through the logistics and to set up home and life in a sensible, considered way.
You probably do not, and if the indications from Asia and most of Europe are accurate, you will probably also shortly have to deal with school and child care being closed and adjusting your home life to deal with physical distancing. This is not normal conditions to be working under, and means that certain (normally good!) home working advice may not be possible or helpful for you right now. That means your first priority is looking after yourself and family and your second priority is being an effective remote worker. It’s okay for this to feel hard at times!
Remote working requires a fundamentally different way of thinking about “work” than being in the office does. You can’t rely on just counting the time from when you arrive in the office to the time you leave as “being at work.” So; how do you think instead?
There’s something critically important you must realise as a manager used to being in an office with your team: whether you mean to or not, you almost certainly judge people’s level of work by how much time they spend at their desk. It’s super hard not to!
In the section below, there’s specific tips on communication - but as a manager/team lead, be deliberate in judging how things are going by people’s status updates and the work they are producing, not by how quickly they answer your chat message. People shouldn’t be on hair-trigger chat response all day (unless that’s their actual job), so give them the space to concentrate and get on with work.
You will also have to think hard about how to help people break tasks down into chunks that you can see updates on on a daily basis. With a team inexperienced at remote working and an increasing chance of people needing to take personal or sick days, it’s important that as many pieces of work as possible are left in a “handoverable” state at the end of every working day.
It is crucial that you (as a manager/lead) take part in the remote working culture and feel its pain points. One of the reasons we believe remote working has been so successful at NoRedInk is having built remote managers (including VPs) into the company right from the beginning of its remote working history.
This is probably the bit you’re here for: practical hints and tips from people who have been doing this for a while. All of these are suggestions, not rules, and some may not be possible for you at the moment. Some of them even contradict! Humans are different, so pick the options that work for you.
TL;DR: I'm going to turn a
Monad
of probabilities into aFree Monad
of probabilities and this is not nearly so scary as it sounds. Also, it's actually useful!
I've been using a bit more Haskell recently, and after watching a demo from a colleague I wanted to solve a problem that's been bouncing around my brain for a while.
I do a fair bit of both game playing and game design (in the board game and tabletop roleplaying sense of 'game'), and I'm often interested in either generating random values or investigating how likely the result of a random process is.
Let's give an example; if I model a dice roll with the "spread" of possible outcomes, it might look like this:
1 2 3 4 5 6 7 8 9 10 11 12 13 14 15 16 17 18 19 |
|
This basically just means that if I roll that dice, I have a 1 in 6 chance of rolling any of the 6 numbers. Now, there are rules for combining conditional probabilities: let's start adding these in.
Haskell has basically given us one for free; if something always happens, we can adjust all of the potential outcomes to incorporate the "something". This can be modeled by being able to map
over the values in our Spread
.
Let's add 10 to our dice roll, regardless of what's rolled:
1 2 |
|
So far, so good. Let's see if we can take this a bit further; turn Spread
into an Applicative
.
1 2 3 4 |
|
Here we set up two things; first, pure
enables us to take any individual value and turn into a Spread
of that value. From a logical point of view, the total probability of all of the items in a spread must add up to "1" (we'll enforce that with smart constructors later) so there's only one choice here. pure
returns a Spread
with a single item in it - probability of that outcome? Certain.
<*>
is the operator that allows us to take a Spread
of functions a -> b
and a Spread
of inputs a
and return a Spread b
. Hmm. How should that work?
Well, to work out the probability of an event A which is conditional on event B, you just multiply the two probabilities together. So <*>
turns out to be reasonably straight forward: you take all possible combinations of functions and inputs, and return each output with a probability of (probability of function * probability of input).
So that's done, but doesn't look immediately useful. It does, however, allow us to escalate one more level: Monad
.
1 2 3 4 5 6 7 8 9 |
|
So we're back on conditional probabilities again. We take each of our values from the input spread and apply our function to it. Then we multiply the probability of the outcome in the "child" spread with the probability of the "parent" input - and finally we concatinate the whole lot back together into a single list and wrap it up in Spread
again.
The way the laws of probability (and, well, fraction multiplication) work, if the total probability in each of our Spread
s is 1, the total probability across all of our outcomes after a bind will also be 1. Neat! Now we have something we can use.
Let's add 10 to every dice that rolls more than 3!
1 2 3 4 5 6 7 8 9 |
|
This is starting to look good.
We do have a problem though: this is a very useful representation for when we want to know every possible outcome and it's probability of happening - but that's not always desirable, or possible.
Let's take a famous example; a game where you flip a coin. If it comes up tails it pays out £1.00 - if you get heads you pay again with double the pay out. How much do you want to pay to take part in this game?
1 2 3 4 5 6 7 |
|
Which promptly creates an infinite last of possible outcome states. In an other use case, it can be nice to just pick an outcome from the sample space. For example, if I want to model how much damage a warrior in my Pathfinder game does with a long sword I may want to look at the probability spread… or I might just want to pick a result at random.
So I want to take this existing monadic data structure, but execute it with different execution strategies. Which meant when someone at work mentioned Free
monads in a demo and mentioned that they capture the shape of a monad without executing it, my ears pricked up.
The theory says that we can take any Functor
and turn it into a Free Monad
; so turning a Monad
into a Free Monad
must be even easier, no?
1 2 3 |
|
Well, the first step is pretty straight forward. Now we can create Prob
representations of dependent probabilities just like before!
Let's have a few functions to create Spread
s which are both guaranteed to be "meaningful" and lifted into our new Prob
type.
1 2 3 4 5 6 7 8 9 10 11 12 13 14 15 16 |
|
Now we can rewrite our previous example:
1 2 3 4 5 6 7 |
|
Success! Kind of. This looks great, and type checks, but I can't actually evaluate the result any more.
Let's see if we can deal with that. The Control.Monad.Free
library provides a hopefully named function called iterM
.
The full type annotation looks like this:
1
|
|
Ouch. Well, we have a Monad
we want to turn things into (Spread
). And we have the Functor
which our Free Spread
is created from which is… Spread
. So let's start plugging in names:
1
|
|
Looking carefully, it looks like all I actually need to supply is a function (Spread (Spread a)) -> Spread a
. Let's see if we can find an easy way to do that in Hoogle, a search engine that allows us to search for function signatures.
Searching for Monad m => (m (m a)) -> m a turns up join
which is already part of the Monad
type class. Abstraction for the win!
1 2 3 4 5 6 |
|
Good stuff. Now life gets really interesting. Let's add in ways of picking a single sample out of a Prob
without evaluating the entire outcome space.
First, we need a way of picking a single outcome from a Spread
. We'll break it down into two functions; pickFromSpread
starts from the knowledge that the probabilities in a Spread
always add up to 1:
1 2 3 |
|
It has a return type of IO a
because picking a random value means the function is not referentially transparent.
Our second function decides whether to take pick the first sample from a list of [(a, Probability)]
based on the Probability of the first item compared to the total of all of the Probabilities in the list. We pass in the total of the remaining probabilities as an argument each time, as the list may be infinite so we don't want to sum
across it.
1 2 3 4 5 6 7 8 9 10 11 12 13 |
|
We can now go from Spread a
to IO a
. Let's plug that into iterM
's type signature again and see what we get:
1 2 3 4 5 |
|
This looks pretty similar to before, where we used join
to unwrap nested Spread
structures. If we could turn that Spread (IO a)
into a IO (IO a)
than we could call join
with it - which we can, because that's exactly what pickFromSpread
does!
1 2 |
|
Now we can call start pulling random samples out of a Prob
:
1 2 3 4 5 6 |
|
This is very fast, and even works well on infinitely recursive definitions like our coin flip above:
1 2 3 4 5 6 7 8 |
|
This technique begins to look interesting when you realize that this technique allows you to take anything implemented as a Functor
and supply an alternative execution method. Want to supply test values in your test instead of values from IO
? This might just let you do that.
That's basically all for now, but I will leave you with a final example.
First, a function that makes all of this usable in practice; the normalize
function takes a Spread
and groups together repeats of the same outcome into a single value:
1 2 3 4 5 6 7 8 |
|
Then a model of an attack in Pathfinder (1st edition), modeling a strike with a weapon against a foe and building in things like critical hits:
1 2 3 4 5 6 7 8 9 10 11 12 13 14 15 16 17 18 19 20 21 22 23 24 25 26 27 28 29 30 31 32 33 34 35 36 37 38 39 40 41 42 43 44 45 46 47 48 49 50 51 52 53 54 55 56 57 58 59 60 61 62 63 64 65 66 67 68 69 70 71 72 73 74 75 76 77 78 79 80 81 82 83 84 85 86 87 |
|
With some results:
1 2 3 4 5 6 7 8 9 10 11 12 13 14 15 16 17 18 19 20 21 22 23 24 25 26 27 28 29 30 31 |
|
I hope you've enjoyed this brief visit to useful abstractions in Haskell; it's definitely a language where as you learn it you realise that you have great power, and great responsibility to the next maintainer!
]]>This post is part of a series! If you haven't already, check out the introduction so you know what's going on.
It's fairly obvious how dependencies work in Shake when all of the files are known while you're writing your rules.
And if a build rule creates a single file matching a pattern, or even a known set of files based on a pattern: that's pretty simple too. Just add a rule (%> for building a single file, &%> for a list) and then when you need
one of the outputs Shake knows how to make sure it's up to date.
Life becomes a little more interesting when you have a rule that takes multiple inputs (detected at run time) and creates multiple outputs (depending on what was found).
Let's look at an example. We're writing a computer game, and the game designers want to be able to quickly specify new types of characters that can exist. The designers and developers settle on a compromise; they'll use Yaml with a few simple type names the developers will teach the designers.
So the designers start churning out character types, which look like this:
1 2 3 |
|
or this:
1 2 |
|
The developers, on the other hand, want to be able to consume nice safe Haskell types like so:
1 2 3 4 5 6 7 8 9 10 11 12 |
|
And we want our code to break at compile time if, for any reason, the Yaml files get changed and we start relying on things that no longer exist. So we're going to set up a build rule that builds a directory full of nice type safe code from a directory full of nice concise and easy to edit Yaml.
Let's see what we can come up to build this safely. Our first shot at a replacement build Rule
looks like this:
1 2 3 4 5 6 7 8 9 10 11 12 13 14 15 |
|
This looks very similar to the previous build rule, with just the addition of a few lines to account for the generated files. The only slightly quirky moment is need ["_build/haskell_generation.log"]
; we need this because Shake has no concept of a rule for a directory. So the rule for _build/haskell_generation.log
creates all of our generated files, so that we can then "get" them on the line below.
We also need to add the rules for _build/haskell_generation.log
and for files in the generated directory, to make sure they're generated before they are used.
1 2 3 4 5 6 7 8 9 10 11 12 13 14 |
|
createHaskellFiles
here is the logic that writes the Generated files, but it could easily be some external tool being called via a script.
Then you run shake, and … the code works! Awesome, we're done, right?
Well, maybe not. The first sign something might be wrong is in the docs. The docs for getDirectoryFiles state: "As a consequence of being tracked, if the contents change during the build (e.g. you are generating .c files in this directory) then the build not reach a stable point, which is an error - detected by running with –lint. You should normally only call this function returning source files."
That doesn't sound good. Maybe we should check the behaviour of our code.
Let's delete one of the generated files, and run Shake again to check it detects that:
1 2 3 4 5 6 |
|
Whew! Maybe we're okay. We'll just run it once more:
1 2 3 4 |
|
Oh. That's not good: nothing has changed, so why have we invoked ghc
?
Here we hit something very, very, important to understand about getDirectoryFiles
(and other Shake Rules and Oracles): they only run once per invocation of Shake.
Let's step through the implications of what this means on each of the build runs.
_build/main
executable to be built; it doesn't exist, so the Action
in the Rule
runs_build/haskell_generation.log
; it also doesn't exist, so we run it's Action
. Several files (let's say, fighter.hs
and rogue.hs
) get written to the generated file directorygetDirectoryFiles
, telling Shake that we depend on the generated files directory having fighter.hs
and rogue.hs
and no other Haskell filesrogue.hs
)_build/main
executable to be built; it exists, so Shake starts checking if it's dependencies have changedgetDirectoryFiles
on the generated file directory, and records that there's now only fighter.hs
in there: the file list has changed_build/main
has changed dependencies so we run it's Action
getDirectoryFiles
is called on the Generated file directory. It has already been run (see above) so Shake does not run it again: it records that only fighter.hs
is depended on even though rogue.hs
has now been recreated_build/main
executable to be built; it exists, so Shake starts checking if it's dependencies have changedgetDirectoryFiles
on the generated file directory, and records that there's now both fighter.hs
and rogue.hs
in there: the file list has changed again!_build/main
has changed dependencies so we run it's Action
In fact, it turns out that if we turn on linting in Shake it will tell us about this problem:
1 2 3 4 5 6 7 8 9 |
|
So: what do we want from our rules here? Let's actually put down the end effect we're aiming for:
need
ed, we should check we have an up to date set of generated filesWe can't call getDirectoryFiles
on the generated Haskell files, for the reason given above; and we can't call need
on the Haskell files after generating them in the _build/haskell_generation.log
to rebuild if they change, because they themselves need
the Haskell generation.
We're going to have to break out some bigger guns.
Firstly, we're going to want to encode from custom logic for when to rebuild based on the environment. We model this is Shake by setting up an "Oracle"; this allows us to store a value in the Shake database, and if it changes between one run and the next anything which depends on it is considered dirty and needs rebuilding.
Secondly, _build/haskell_generation.log
is going to stop being just a "stamp" file to get around the fact that Shake doesn't know about directories, and we're going to start storing some useful info in there.
Of course, we still need to be careful: just like running getDirectoryFiles
, our Oracle is only going to be evaluated once for the whole run of Shake, and it will be evaluated to check dependencies before the actual rules which depend on it are run.
Let's go with a model where we assign each run of the generator a unique ID, which we'll use in our Oracle and stash in our output file so that we can return the same ID if nothing has changed on disk.
We'll create some reusable code to do this; we'll take a list of patterns for generated files this rule controls, an output file, and an action to generate the files. I'll show you the code in full, and there's some explanation underneath:
1 2 3 4 5 6 7 8 9 10 11 12 13 14 15 16 17 18 19 20 21 22 23 24 25 26 27 28 29 30 31 32 33 34 35 36 37 38 39 40 41 42 43 44 45 46 47 48 49 50 51 52 53 54 55 56 |
|
The file starts with some boiler plate code needed for storing the unique identifier in the shake database.
Then we have the logic for creating a run ID:
That means that if the list of generated files has changed, we know we need to run the generator.
Then we have a rule that matches all of the patterns for files which will be generated, and depends on the output file.
Finally, we have the rule for the output file:
This completes the loop and lets us check next time around if the list of generated files has changed.
What does it look like to use? Something like this:
1 2 3 4 5 6 7 8 9 10 11 12 |
|
We have to add the oracle to our rules (only once, not per generator). Then we just call our reusable code with specify the output file, the pattern of files out will be generated, and the logic to generate them (including specifying dependencies of the process).
We're nearly there, but we still have a problem. We called getDirectoryFiles
on the Haskell source files in our Haskell compile build rule! It turns out that it's not just in the Rules for the generated files themselves that you need to be careful: you just can't reliably call getDirectoryFiles
on generated files anywhere in your build specification.
We can get around that in two ways. One is that we can separate depending on source files (call getDirectoryFiles
with a pattern that doesn't include any of the generated files) from the generated files, and add a helper like the one below to get which files have been generated:
1 2 3 4 5 6 7 8 9 |
|
Usefully, this also ensures that if you ask for the list of generated files the file generation rule will be called!
Alternatively, if we're happy that all of our input files have now been created, we can often get our tools themselves to tell us what they used. Shake allows us to call the needed
function here to record a dependency that we've already used. Be aware though that this will error if anything changes the needed
file after you used it!
As an example, we can combine the use of ghc
's dependency generation flag and Shake's makefile parser to rewrite our Haskell rule to the following:
1 2 3 4 5 6 7 8 9 10 11 12 13 14 15 16 17 18 19 20 21 22 23 24 25 26 27 28 29 30 |
|
This runs the compile process, and then calls ghc
telling it to write all of the dependencies it used to a temporary makefile. We then use neededMakefileDependencies
to specify that we did use those files, even if we didn't know we were going to before building.
Just make sure that you've needed anything that the build system needs to create/update before you run your compile action though!
]]>This post is part of a series! If you haven't already, check out the introduction so you know what's going on.
There's a bunch of nice tools out there these days that operate on your source code itself, such as auto-formatting and linting tools.
How to configure rules for this kind of thing in Shake isn't immediately obvious when you're new to using it. The first time I did it, I ended up with something that looked like this (only showing relevant rules):
1 2 3 4 5 6 7 8 9 10 11 12 13 14 |
|
Which at first glance looks great! I've made sure that I find and run hlint
(a Haskell linting tool) on the source files before I "need" them - remember, once a file has been "needed" in Shake it should not be changed. The code is simple and easy to read. hlint
gets efficiently run on the whole list of source files all at once.
What's not to like?
Well: there can be a couple of issues here. One (doesn't happen often in Haskell, but happens a lot in dynamic languages!) is that several targets could all depend on the same source file. Do all of the targets run the formatter? Who gets there first?
The other problem is that if any source file changes, the command has to be re-run on all of them: if you have a lot of source files and a slow linter or formatter, that's a big problem. In fact, avoiding that kind of thing is the reason most people start using Shake in the first place!
So we need to move the formatting/linting into the rule for the source file itself: this is the only way to guarantee that whoever uses the file, whenever they use it in the build process, the file will already be formatted before it's read.
Version two of my code ends up looking like this:
1 2 3 4 5 6 7 8 9 10 11 12 13 14 15 16 17 |
|
This is Shake at its best: super explicit, clear and easy to read. The only slightly quirky thing here is the call to disableHistory
; rules where the output and the input are the same file don't play nicely with Shake's optional caching system (shakeShare
and in the future shakeCloud
) so we specify that this rule shouldn't try and use cached results.
Unfortunately, we do still have a problem: formatting/linting software is often very fast per file, but normally has a short start up time. When you're starting to format 1,000s of files, that start up time becomes a problem. So now we have technically correct, but unusable code.
Fortunately, the authors of Shake have come across this issue before, and included the amazingly useful batch
helpers.
To use batch
we need a few things:
a -> Action b
)[b] -> Action a
)Behind the scenes, the first time that Shake finds that a target is supplied by a batch function, it doesn't queue building that target immediately. Instead, it runs any preparation steps and then punts the batch to the end of the queue. It keeps on doing this until it either a) runs out of work to do that isn't in the batch (at which point it will start with whatever size batch it has) or b) the maximum batch size has been queued. Then it will run the batch command.
It looks like this:
1 2 3 4 5 6 7 8 9 10 11 12 13 14 15 16 17 18 19 20 21 22 23 |
|
Voilà! Correct, fast code.
Of course, engineering reality is full of trade offs, and we have made one here. Because the batch
action is run on a list of files, that means that if any one file fails the batch, the entire batch is counted as failing. This is also true if an other rule fails while a batch is processing and Shake cancels the batch.
So while it might be tempting to just turn the batch number up and run the whole lot at once, it might be a better idea to spend a little time tuning the numbers to match the size of your code base and the speed of each batch.
Next up: working with generated files.
]]>Shake is basically a domain specific language built on top of Haskell, so knowing Haskell can definitely help you unlock it's full power. But you can get a long way for basic builds by just working with some simple building blocks. You will have to jump through some extra hoops to get it installed and write your scripts with editor support if you're not using Haskell anyway - but we are, so that wasn't much of an obstacle for us!
I'm not going to go into the really basic ideas behind Shake: the main website (linked above) has a good introductory demo, and Neil Mitchell (who wrote Shake) has given numerous (very well done) talks on the ideas behind it. What I'm going to do over a few posts is look at some of the things which caught us out, and what you can do about them. I'll try and remember to link each post here as it comes out!
In this introduction, I'm going to show you the mini-example project that we'll be using in each of the following blog posts. All of the examples can be seen in full (with runnable code!) at https://github.com/mavnn/shake-examples, but if you want just want to follow along you can pretend and just read the Shake files here.
Our "base" Shake file just knows how to build a Haskell project from a group of "*.hs" files in the src
directory - everything else will build up from there! This is our starter Shakefile.hs
:
1 2 3 4 5 6 7 8 9 10 11 12 13 14 15 16 17 18 19 20 21 22 23 24 25 26 27 28 29 30 31 32 33 34 35 36 37 38 39 40 |
|
What does this do? Well, there's a bit of boilerplate to import the Shake
libraries and configure Shake. We also set the wanted output of a default build in this main
function: in this case an executable called main
in the _build
directory (or main.exe
on Windows).
Then we have two rules:
This second rule goes through a few steps:
getDirectoryFiles
to get and depend on the list of "*.hs" files in the src directory. If any *.hs files are added or removed, the rule will be re-run.need
s all of the *.hs files it found. This means that if the content of any of those files changes, the rule will be re-run.ghc
, a Haskell compiler, telling it to put all of it's build artifacts and the output file in the _build
directory.Now: let's start looking at how to build in some more troublesome (or at least, less obvious) functionality you might want in a larger project.
]]>Over the last few weeks, they've been publishing the videos of this year's talks, and mine appeared without me noticing. If you're interested in a deep dive session on using property based testing to test a templating library, you might find this interesting…
You can find all of the example code on GitHub: https://github.com/mavnn/ndcoslo2018
]]>Given that we're a two person company, and only one of us is a developer, that means we won't be taking on any other work for the foreseeable future!
So, what's going on, why, and what does it mean for you?
The reasons come on a few levels, but they basically boil down to:
There are other reasons, and not necessarily minor ones:
I'm only just getting started with them (last week they had a 3 day retreat I was able to join them for, this week I'm at NDC Oslo), but so far I can tell you that they seem to be a great bunch of human beings with a clear, concrete, targeted plan on how to make (one aspect of) the world better. I can get behind that.
Well, basically it means that @mavnn ltd will no longer be running on site training or ticketed training events, and we won't be available for bespoke development. It also means that I'll be a lot less active in the F# community; I have 3 new programming languages to learn and become productive with in fairly short order.
Having said that, you can probably expect some cross-ecosystem pollination talks at conferences in the future!
Anyway: enough about me. I now return you to your regular schedule of techy bloginess.
]]>This means it's time for a little practice for me, and a mini-tutorial for you (and future me).
We're going to build a small server application based on Freya which will serve JSON and be a nice RESTful (in the loose sense) API.
Then, we're going to configure Fable with Elmish to load data from that API. The crucial thing here is that we're going to configure both projects such that we have a seamless development work flow; automated recompile and restart of the server on code changes, and automatic recompile/reload of the Fable UI on change.
Make sure your dotnet core Freya template is up to date:
1
|
|
In a root directory for our overall solution, run:
1
|
|
This will create a new directory called "FateServer" with a F# project in it. Go into the directory and make sure everything has restored correctly:
1 2 3 |
|
One thing I've been slowly learning with dotnet core is that the restore
run by default during a build doesn't always seem to be as effective as actually running the full restore command. Just in general, if Core is behaving strangely, running restore
is a good starting point.
Next up is making our server log something: by default, Kestrel logs basically nothing.
Install the logging package (it's not part of the default Freya template):
1 2 |
|
In Program.fs
add the following at the end of the open statements:
1 2 3 4 5 6 |
|
Then inject the method into your WebHost configuration pipeline:
1 2 3 4 5 |
|
Hey presto! Run your application and get logs!
To finish off the niceties of civilized development, let's add the watch command to our server.
Crack open the fsproj
file and add the following ItemGroup to it:
1 2 3 |
|
Run dotnet restore
and from now on running dotnet watch run
to start continuous development with file watching should work.
Now we just need to serve up some JSON. We want a send a format which Fable understands, and the kind people at the Fable project have written a Newtonsoft configuration for doing exactly that.
Stop watching the build long enough to run:
1 2 |
|
Next, set up the domain. Create a new file Character.fs
(we're going to be sending back and forth Fate Accelerated characters as data). Make sure you add it to the project file before Api.fs
.
1 2 3 4 5 6 7 8 9 10 11 12 13 14 15 16 17 18 19 20 21 22 23 24 25 26 27 28 29 |
|
Now move across to Api.fs
. You'll see that it defaults to a single "greeting" endpoint which responds with a text response. Let's add a helper for sending JSON correctly, immediately after the existing open
statements:
1 2 3 4 5 6 7 8 9 10 11 12 13 14 15 16 17 18 19 20 21 |
|
Next, delete the entire rest of the file and add the following:
1 2 3 4 5 6 7 8 9 10 11 12 13 14 15 16 17 18 19 20 21 22 23 24 25 26 27 28 29 30 31 32 33 34 35 36 37 38 39 40 41 42 43 44 45 46 47 48 49 50 51 52 53 54 55 56 57 |
|
There's quite a lot going on in there, but what we've defined with characterMachine
is a resource which checks if a character exists, and sends it as Fable readable JSON if it does. We then configure a route to point to it.
Critically, we also turn on CORS (Cross Origin Resource Sharing) for localhost:8080 for debug builds. This will enable requests from our Fable client running it's development server on a different port to talk to the server.
Edit: Zaid Ajaj points out that you can also configure webpack's dev server to proxy to your development front end. If you're writing a system where your API and client will be running on the same domain, check out how to do that below.
Go back up into the root directory of the solution, and run:
1
|
|
To get a dotnet core template for Fable with F# wrappers for React and Bulma - as well as Elmish pre-installed.
Then run:
1
|
|
To create our client application.
Go into the newly created project directory, and use the built in build scripts to get everything up and running:
1 2 |
|
On first run, it will download most of the internet, but such is modern net development.
Browse on over to http://localhost:8080/ to see the base template before we start hacking away!
Very pretty: and in App.fs
we can see the nice clean Elmish code driving it.
If you're running both API and client on the same domain, this is also a good time to update your webpack config (you'll find webpack.config.js
in your FateClient directory). Amend the devServer
section as follows:
1 2 3 4 5 6 7 8 9 10 11 12 |
|
If you do this, you'll want to change the URL below used to load the data.
Now! Let's start hacking away. Firstly, we're going to want to share our character types. I've decided here that they are owned by the server, so we need to link the file into the Fable project.
In FateClient.fsproj
, add change:
1 2 3 |
|
to:
1 2 3 4 |
|
Now we can load up our character. In App.fs
, it's time to expand our model. Change our Elmish app as below:
1 2 3 4 5 6 7 8 9 10 11 12 13 14 15 16 17 18 19 20 21 22 23 24 25 26 27 28 29 30 31 32 33 34 35 36 37 38 39 40 41 42 43 44 45 46 47 48 49 50 51 52 53 54 55 56 57 58 59 60 61 62 63 64 65 66 67 68 69 70 71 72 73 74 75 76 77 78 79 80 81 82 83 84 85 86 87 88 89 90 91 92 93 94 95 96 97 98 99 100 101 102 103 104 105 106 107 108 109 110 111 112 113 114 115 116 117 118 119 120 121 122 123 124 125 126 127 128 129 130 131 132 133 134 135 136 137 138 139 140 141 142 143 144 145 146 147 148 149 150 151 |
|
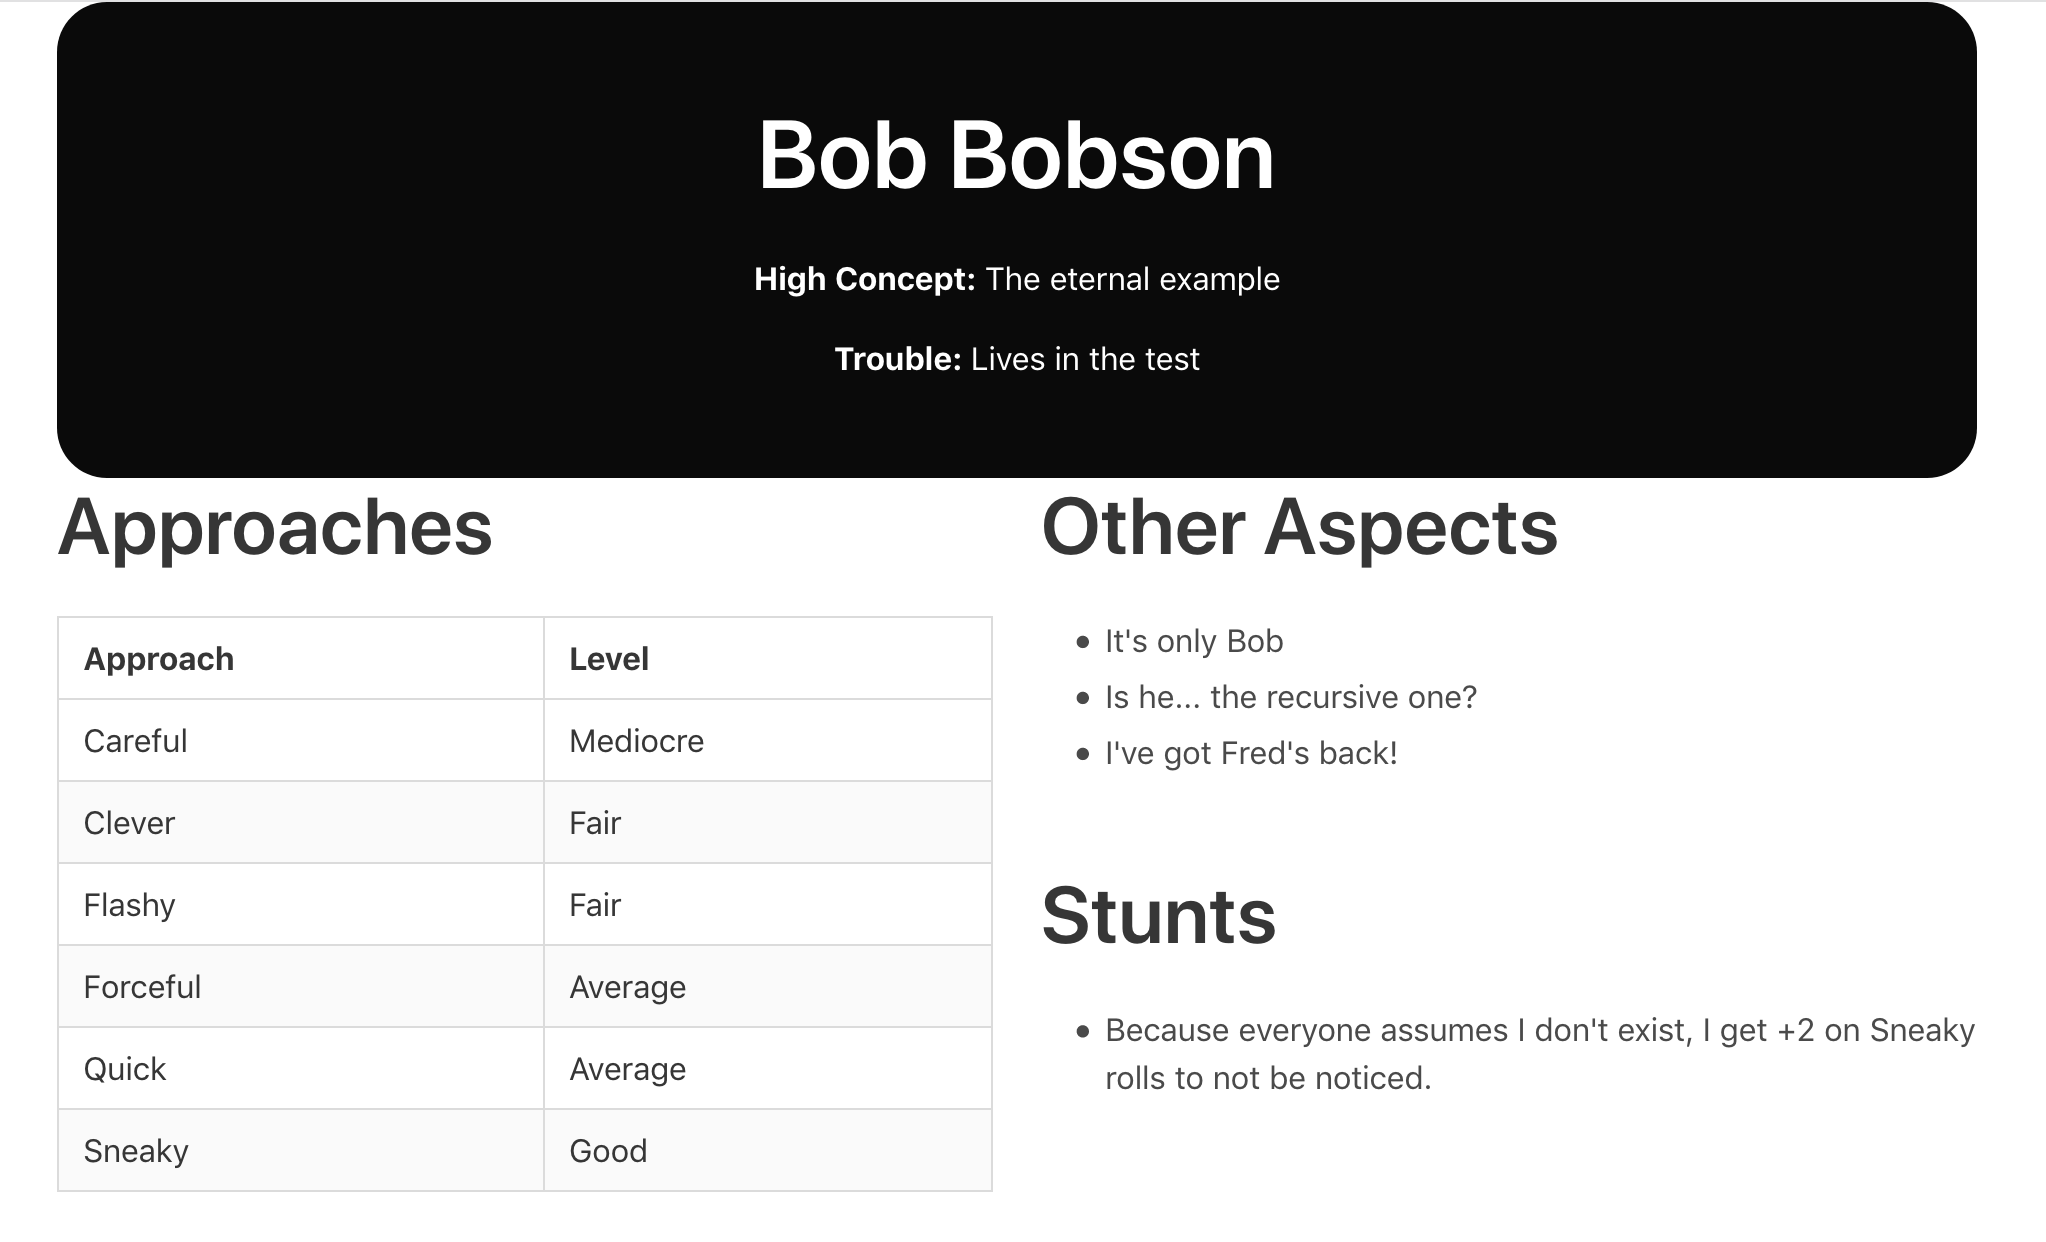
And there you have it - a simple app that loads "Bob" from our server, using the generic fetchAs
method to cast the JSON back into our strongly typed world. Making the application interactive and more attractive is left to the user; it gets quite addictive with a nice type safe wrapper over React and auto-reloading.
Till next time…
]]>One of the challenges RouteMaster faces is that once you have defined your "route" in RouteMaster, you generally want to run multiple instances of your process manager service in your distributed environment. This means that a lot of care has been taken to make sure that things like work flow state is handled safely, but it also causes a particular challenge for dealing with timeouts.
RouteMaster nodes for managing the same process maintain a shared list of messages they are expecting to receive - and how long they're willing to wait for them. This list is stored in a transactional data store.
Approximately every second, the list should be scanned, and messages which have not been received before their timeout should be removed and TimeOut
messages published to the process' time out handlers.
It turns out that this scan is the single slowest action that RouteMaster needs to take… and here we have all of the nodes carrying it out every second or so.
My first thought was the sinking feeling that I was going to have to implement a consensus algorithm, and have the nodes "agree" on a master to deal with time outs.
Fortunately I had the good sense to talk to Karl before doing so. Karl pointed out that I didn't need exactly one master at any one time; if there was no master for short periods, or multiple masters for short periods, that was fine. The problem only kicks in if there are lots of masters at the same time.
He mentioned that there was a known answer in these kinds of situations: have a GUID election.
The logic is fairly straight forward, and goes something like this…
Each node stores some state about itself and the other nodes it has seen. (The full code can be seen at in the RouteMaster repository if you're curious, but I'll put enough here to follow the idea).
1 2 3 4 5 6 7 8 9 10 11 12 13 14 15 16 |
|
As you can see, each node starts off with a unique ID, and keeps track of every other ID it has seen and when. It also sets the "lowest" GUID it's seen so far to the value Guid.MaxValue
:
1 2 3 |
|
A MailBoxProcessor
is then connected to the message bus (we're in a message based system) and to a one second Tick
generator.
If a new GUID arrives, we add it to our state, and check if it's the lowest we seen we far. If it is, we record that. If it's also our own, we mark ourselves Active
.
1 2 3 4 5 6 7 8 9 10 |
|
Every second, when the Tick
fires, we:
1 2 |
|
1 2 3 4 5 6 7 8 9 10 11 12 13 14 15 16 17 18 19 20 21 22 23 |
|
1 2 3 4 5 6 7 8 9 10 11 |
|
This is the clever bit: if the lowest GUID we've seen in a while is our own, we're the "master" node and we take responsibility for dealing with timed out messages. We'll stay active until a message arrives from a node with a lower GUID. There's no guarantee at any particular point that only one node will definitely think it's the master, or that a master will definitely be the only master - but it's more than good enough for the needs we have here.
If you need to do something hard, ask Karl how to do it. No - wait. That's good advice, but the real moral is:
Make sure you're building what you actually need - not something vastly more complex for no practical gain.
]]>Full details below!
.NET was first created in a world of monolithic enterprise deployments installed on physical servers, and desktop applications distributed via CD.
Now the world has moved on, and so have our expectations. The new normal has become:
The term “Cloud Native” has been used to describe code that is designed to live in this brave new world of automated deployments and cheap virtual infrastructure. We’ll examine some of the principles and techniques underpinning the design of automatically deployable, trivially scalable, reliable, and easily maintainable software systems built with .NET.
All with the logging, monitoring, and metrics you need to know what’s really happening in production.
We’ll use Kubernetes to define a multi-service system, digging into how and why the overall system has been designed the way it has. Finally, we’ll put it all together, creating new functionality by adding .NET Core services to our system.
A git repository of your completed work, which will include:
At The Skiff, right next to Brighton Station (good links to London and Gatwick Airport).
“I felt there was a gap between my good understanding of the language and actually applying it on bigger “real” projects. Michael’s great training skills have enabled me to quickly practice some advanced topics I was less familiar with. With my newly acquired knowledge, I’m confident I will be able achieve some great (and fun) development.”
- Hassan Ezzahir, Lead developer (Contractor) at BNP Paribas
“Huge thanks to @mavnn for coming from London to @Safe_Banking Atlanta and giving an All-Week #fsharp Training Session to our Dev Team. By all accounts it was a great time and everyone learned quite a lot. His approach is very practical and use case oriented, highly recommended.”
- Richard Minerich, CTO Safe Banking Systems
“Thanks to @mavnn for an excellent “Building Solid Systems in F#” workshop in London last week. Really enjoyed the course material and meeting everybody (Also I’ve been inspired to teach myself Emacs :)”
- Kevin Knoop, AutoTask
Right here! There’s an early bird discount which runs to the end of March, and if you’re a user group member ping me (or get your user group to do so!) and we’ll work something out. If the form below doesn’t work for you, you can also get them direct on EventBrite.
]]>Author's note: This post is a quick start to help you get a single F# based service up and running on Kubernetes. If you want the full story on how to design a distributed system, we offer commercial training and consulting services to help you with that.
"Kubernetes is an open-source system for automating deployment, scaling, and management of containerized applications" - in other words, it will handle more deployment, health monitoring and service discovery needs out of the box, as long as you can turn your application into a container. So, let's have a quick look at how to do that with an F# application.
We going to use Minikube to start up a local Kubernetes "cluster" (it will only have a single node), and installation and first start depend slightly on operating system and which virtual machine backend you want it to use. Instructions on installing it can be found here.
Note that Minikube depends in turn on kubectl which will also need to be installed.
The example application we're going to deploy is going to be a .NET Core app running on Linux, so you will also need the .NET Core SDK 2.0+ installed. We're going to leverage the dotnet
command line tool a fair bit.
Finally, most of the commands you need to run will be given in bash syntax. Hopefully you have bash installed (via installing git
if nothing else!), but if you don't it should be fairly clear how to carry the steps out in other consoles.
First things first; start up minikube.
1
|
|
It will take a little while to get going, especially on the first run when it will download an ISO image to create its own virtual machine. You can carry on with other steps as it warms up.
While that's going on, let's lay out a nice project structure to store all the things we're going to need. All future command line snippets will assume you're running them from the root of this structure.
1 2 3 |
|
Before we can run an application in Kubernetes, we need an application. So let's start with that. We're going to use the .NET Core Freya template to create a simple console application with a single HTTP endpoint on it.
If you don't have the Freya template installed, grab it first using:
1
|
|
Now we can create our project.
1
|
|
Run a restore just to make sure everything is as it should be, and then you should be able to start up your service:
1 2 |
|
It should tell you it has started a web server on socket 8080, and surfing to http://localhost:8080/hello
should get you a "Hello, world!" response.
Great - it works! Hit ctrl-c to shut it down again.
We just need to make one change here; because we're going to deploy this on a container, we can't only listen on local host. Go into Program.fs, and change the main
function to look like this:
1 2 3 4 5 6 7 8 9 10 11 12 |
|
Now we need to turn it into a docker container so it can run on Kubernetes.
Create a new file in the docker directory called WebHelloDockerfile
(imaginative, I know). Docker will use this file to create a image based on our code. To make sure that the image created is the same as what we're going to deploy in production, we don't create the image from the compilation output on our development box - instead, we actually use a intermediate docker container to build our source code with a known version of the .NET Core tool chain. We use the exact same docker file (and therefore versions of the tool chain) for our continuous integration builds. Thanks to Steve Gordon for pointing out this trick for me.
Into the file, put this contents:
1 2 3 4 5 6 7 8 9 10 11 |
|
This is a multistage docker build; we're asking docker to use the a container based on microsoft/dotnet:2.0-sdk
to restore and build our code - but the final image we're creating (i.e. the last one in the file) is based on microsoft/dotnet:2.0-runtime
, just copying across the result of running dotnet publish
. Between the final image not having the SDK installed, and only copying exactly the files we need to run our application, we create a much smaller image this way.
Don't run a normal docker build straight away! Even if you have docker installed, we don't want to build this image on your computer's docker - we want to build it directly in minikube's docker so that Kubernetes can find it. Kubernetes also knows how to pull images from external docker repositories, but we don't want to set one up right now.
To run a command inside minikube, we can take advantage of minikube's ssh and mount functionality.
In a separate terminal (or as a detached process if you know what you're doing) in the same directory, run:
1
|
|
This will expose the current directory (.
) to the minikube machine at the location /host
. You might need to use a full path local under windows, quoting it so the :
in the drive name doesn't confuse things.
Now (back in our original terminal) we can run:
1
|
|
No need to even have docker installed on your host computer at all. Running this command will take quite a while the first time; don't worry too much, it caches everything so it will be pretty quick from now on.
So this is all great, and we now have a docker container. We still need to tell Kubernetes about it though. Create yourself an other file, this time in the kube directory. Call it webhello.yml
and put this in it:
1 2 3 4 5 6 7 8 9 10 11 12 13 14 15 16 17 18 19 20 21 22 23 24 25 26 27 28 29 30 31 32 33 34 35 36 37 38 39 40 41 42 43 44 45 46 47 48 49 50 51 52 53 54 55 56 57 58 59 60 61 62 63 64 |
|
Whoa! That's a wall of text. What's going on here?
Well, the first section is telling Kubernetes that we want a service called webhello
; it should expose a port called http
and it should route requests to it to pods
that are part of the app called webhello
.
What are these pods
? Well, you can read more about that in the Kubernetes documentation, but for now we can assume they are instances of our application running. But our service won't do anything until it has pods to route to, which is where the second section of the file kicks in. Here we tell Kubernetes that we want to create a deployment with rules to govern how the webhello
app should be deployed. We say that there should be 3 copies running, and that when new versions are rolled out that we want to start a pod with the new version and wait for it to be healthy before we shut down each old pod (the maxUnavailable
bit).
Finally, we give a specification of how to create these 3 pods we've asked for; we want to base it on the image webhello
(using the local version, and not trying to check for updates…), it shouldn't need much memory (the limit helps the garbage collector kick in), it exposes a port and that it shouldn't be considered alive or ready if it doesn't respond with a success code on http requests to the endpoint /hello
.
In yet an other terminal, fire up the command kubectl proxy
. This will give you access to the Kubernetes api, including it's built in dashboard. If you now surf to the pods page in the dashboard, it should tell you there are no pods deployed.
Back to our first terminal; run:
1
|
|
To apply all of the config files in the kube directory to the currently connected cluster.
Refresh your dashboard a few times, and you should slowly see your pods appearing and becoming live.
This is good progress - we have a service up and running. Unfortunately, we can't see it.
For our final step, let's configure Kubernetes to allow external access to this service. This is normally done by making use of the Ingress resource - what that actually represents is up to your Kubernetes provider, but in the case of Minikube it will use an nginx server as a proxy from the outside world to our services.
First, make sure minikube has ingress support enabled:
1
|
|
Now add a second file into the kube directory called ingress.yml
. Stick the following content in:
1 2 3 4 5 6 7 8 9 10 11 12 13 |
|
Hopefully it should be fairly clear what this does!
Apply our config to the cluster again:
1
|
|
Setting up the ingress can take a moment, so run:
1
|
|
a few times until you get a response in that contains an IP address. At this point, you should be able to hit the IP address listed by kubectl
on the /hello
or /hello/yourName
paths; normally it will be http://192.168.99.100/hello. Depending on Minikube version, you might have to allow a self signed certificate called "ingress.local" to get through.
And there you have it - an F# service deployed in Kubernetes.
One last trick - because you're just pushing images direct into Minikube's docker rather than into a registry of any kind, Kubernetes won't pick up new versions of the image. If you do a build and want to deploy the changed image, try using something like this to add a updated
timestamp to your deployment configuration:
1
|
|
Because your deployment has changed, Kubernetes will then try and refresh all the pods with the latest version of the image. Enjoy watching your magic, zero down time deploy roll on through.
That's it for now!
]]>Here's how.
Over the years, I have become a big believer in using standards where standards exist (unless they're actively terrible); as such, for authentication we'll be assuming that our system includes an OAuth2 compliant authorization server. Depending on our needs, this might be an external service or a self hosted solution such as IdentityServer.
We're going to set up an API which will use "token bearer" authentication. This means that the client is responsible for obtaining a valid token from our authorization server which includes a claim for access to the resource our API represents. How the client gets the token, we don't really care: there are several ways of obtaining a grant from an OAuth2 server and I won't be going too far down that rabbit hole here (although check the end of the article for an example).
Let's start coding, and add authentication to the "hello" endpoint of the Freya template project. Set up a new file for our Auth
module, and open up everything we need.
1 2 3 4 5 6 7 8 9 10 11 |
|
Most of these should make sense; the additions are IdentityModel
and a Logging
module. IdentityModel is a NuGet package supplied by the IdentityServer project which implements the basics of the OAuth2 specification from a consumers point of view, and gives a nice client API over the top of the various endpoints an OAuth2 compliant server should implement.
The Logging
module is the one from my previous blog post; any logging here is optional, but in practice is really very helpful in an actual production distributed system.
The first thing we're going to do is create a DiscoveryClient
. OAuth2 servers provide a discovery document which specifies things like it's public key and the locations of the other endpoints. In theory, this information can change over time - in this case I'm going to statically grab it on service start up.
1 2 3 4 5 6 7 8 9 10 11 |
|
Your configuration here will vary considerably: I'm running within a kubernetes cluster using an internal DNS record, so I'm overriding the normal safety checks. If you are deploying a service which will be calling the identity server on an external network, you obviously shouldn't do this…
The freyaMachine
has separate decision points for whether the request is authorized
and whether it's allowed
. Authorized is the simplest: a request is authorized if it has an authorization header. Let's build a method which checks that for us:
1 2 3 4 5 6 7 8 9 10 11 12 13 |
|
Most of the code here is actually logging - but you won't regret it when your customers ask you why they can't authenticate against your API.
Now we're onto the more interesting case; the caller has made an attempt to access a secured resource, and they've supplied some authentication to try and do so.
Let's check first if they've supplied a "Bearer" token; this is the only authentication style we're allowing at the moment.
1 2 3 4 5 6 7 8 9 10 11 12 13 14 15 16 17 18 19 |
|
Now we can check the token to see if it is valid. If the token is a JWT token we could choose to check it locally; we have the public key of the issuer available. Here I've decided to go the route of checking each token with the issuer, as that means that we pick up things like token cancellation. Your strategy here will depend a lot on your use case, and IdentityModel
also allows for caching to allow a good compromise.
Checking the token can be done via an asynchronous call with the IntrospectionClient
. As I'm using Freya compiled against Hopac
I'm wrapping it in a job
- you could equally wrap it in an async
block if you've using Async Freya.
1 2 3 4 5 6 7 8 9 |
|
And now the last step is to build a allowed
decision point. Our decision point takes three parameters: the name of this API resource, as known to the identity server, the shared secret between resource and identity server, and the scope this particular resource within the API requires. Normally this will be something like read
or write
. An entire API will normally share a single name and secret, while each endpoint may require a different scope.
1 2 3 4 5 6 7 8 9 10 11 12 13 14 15 16 17 18 19 20 21 22 23 24 25 26 27 28 29 30 31 32 33 34 35 36 |
|
Apart from actually checking whether access is allowed, the other important thing we do here is add the calling clientId to the OWIN state. This means that we can make use of the clientId in any further pipeline steps (and in our logging).
So: we now have an authMachine
which will check if you're allowed to do something… but doesn't actually do anything itself.
Time to switch back to Api.fs
from the template project (making sure you've added in both the Logging
and Auth
modules to the project).
Amend your helloMachine
as follows:
1 2 3 4 5 |
|
and finally make sure that you remember to inject your logger (see the previous blog post):
1 2 3 4 |
|
Now we should be able to spin everything up.
We'll be using Client Credential authentication for this example; this is a grant type used when a "client" is requesting access to a "resource" when no "user" is present. It's a standard grant type covered by the OAuth specification, and we're going to assume that we have an OAuth2 compliant authority available to issue allow introspection of tokens.
This type of grant is generally used for service to service communication - there's no user interaction at all, just an agreed pre-shared "client secret" (an API key).
First we need to get a token from our identity server using our clientId and clientSecret (this client must be configured in the identity server).
If you're using IdentityServer4 like I am, your request will look like this (curl format):
1 2 3 4 5 |
|
You'll get back a response including a token:
1 2 3 4 5 |
|
Now when you call the secured API, you need to add the token to your headers:
1 2 3 |
|
If you don't supply the authorization
header at all, you correctly get a 401
response; if the token is invalid or you (for example) try and use Basic
authentication, you receive a 403
. Both return with an empty body; if you wanted to make the pages pretty you would need to add handleUnauthorized
and handleForbidden
to your freyaMachine
. Here, for an API it's probably as meaningful to just leave the response empty. There isn't any further information to supply, after all.
And there it is: token bearer authentication set up for Freya.
Interested in how you can set up the whole environment in Kubernetes including IdentityServer, logging, metrics and all the other mod cons you could desire? There's still time to sign up for Building Solid Systems in F# at the end of the month!
]]>So… my first, slightly annoying answer is that I try not to. Mark Seeman has written about this in a great series of blog posts which I won't try and repeat here.
Still, there are occasions where you want to quickly and easily do… something.. with a dependency making use of the context that being inside a Freya workflow provides. Let's quickly walk through how I inject a logger into a Freya workflow which "knows" about things like the request ID Kestrel has assigned to the current request.
I'm going to use Serilog as an example below, but you could also use any other structured logging library (I like Logary, but there isn't a .NET Core release at time of writing).
I'll annotate the code inline to give you an idea what it's doing.
So; our first module is shared code which you'll probably want to reuse across all of your Freya services. Put it in a separate .fs file (it assumes Serilog has been taken as a dependency).
1 2 3 4 5 6 7 8 9 10 11 12 13 14 15 16 17 18 19 20 21 22 23 24 25 26 27 28 29 30 31 32 33 34 35 36 37 38 39 40 41 42 43 44 45 46 47 48 49 50 51 52 53 54 55 56 57 58 59 60 61 62 63 64 65 66 67 68 69 70 71 72 73 74 75 76 77 78 79 80 81 82 83 84 85 86 87 88 89 90 91 92 93 94 95 96 97 98 99 100 101 102 103 104 105 106 107 108 |
|
So that's great and all… but how and where do we actually call that injectLogger
function?
Well, that goes in your application root where you build your final Freya app.
Mine normally ends up looking something like this:
1 2 3 4 5 6 |
|
Because injectLogger
returns a Freya Pipeline
type which always passes handling onto the next step in the pipeline, all that first step does is add in a newly initialized ILogger to the Freya state, and then passes things on down the chain as normal.
In your Freya code, logging looks like this:
1 2 3 4 5 6 7 8 9 |
|
Notice that do!
is required for logging now, as our log methods have type Freya<unit>
. This is what allows us to add the request specific context to our logs without explicitly having to append it ourselves every time.
I'm not sure if this strictly answers Eugene's question, but I hope all you (potential) Freya users out there find it helpful regardless.
]]>I won't be mentioning personal, company or exact team names here as I've not been given explicit permission to do so; if the people who were on the course want to chime in I'll add their comments.
Although mostly a Ruby on Rails shop, this company also relies on machine learning and expert systems to deliver some of its core services. The R&D department (who build the models) settled on F# for development as a good balance between:
Having examined the available options in depth, they decided on a standard stack for creating F# microservices of:
They wanted to investigate the use of Hephaestus as a rules engine (Freya uses Hephaestus to process HTTP requests). Many of their machine learning models only work with quite constrained ranges of input values, and Hephaestus as a rules engine looked an effective way of routing decisions to the "correct" machine learning algorithm for a particular input range. This in turn would allow for the models to stay reasonably simple and testable.
Having made these decisions, the company needed to bring the production services team up to speed on what R&D were going to produce, especially because production had expressed an interest in having F# as an extra potential tool for their own projects.
My brief was to create 5 days of training, after which production needed to know enough about the F# libraries in use that they could work out what R&D's code was doing, and enough about running .NET code in production to feel confident adding error handling, logging, metrics, tests and all the rest of the "engineering" side of development which is not about the programming language but the surrounding ecosystem.
I knew that I had a lot of ground to cover in just 5 days, so there was no way that the team was going to come away with all of the new knowledge absorbed and at their finger tips. At the same time, it couldn't be an overwhelming flood of information.
I decided to split the training time between a deep dive in understanding a few key areas in depth (Freya's design, optics and testing), and providing worked examples for the rest which could be referred back to when they became needed. Although I had relevant training material on several of the areas already, it was all tailored in this course to fit a single theme: over the course of a week, we were going to build a microservice that did just one thing, and we were going to test the heck out of it.
The timetable ended up looking like this:
Overall the course seemed to go really well. At the end of it, the delegates were confident about the basics of building HTTP resources with Freya and Chiron, and happily building benchmarks and tests for their existing code base. For other areas (the boiler plate for plugging logging into Kestrel and Freya, for example) they understood the concepts and felt the course notes were sufficiently detailed they that could make use of them in other situations as needed. That was incredibly pleasing to hear from my point of view, as the course notes for these sessions are by far the most time consuming part of the process to create.
Although they missed some of the features of Ruby when writing F#, pattern matching with discriminated unions was a big hit and they liked the enforced discipline of Freya that required separating the logic of the various stages of handling an HTTP request - and how reusable that made components for handling concerns such as authentication.
Finally, all 3 of the core participants (there were other people around for certain parts of the course) came away saying that they'd really enjoyed it and found it interesting throughout - so that's a big win right there!
Yes; this particular course was tailored for the specific circumstances, but I've also provided training on the more conceptual side (functional programming concepts) through to the gritty detail of DevOps (with both new and existing code bases).
We can also tailor delivery to match your availability; for this course I traveled to Munich to deliver it, and so it was delivered in a single 5 day unit. For other clients we can arrange regular shorter sessions or even remote workshops (group or individual) with tools such as Zoom.
And if you just want to turn up at a venue and get trained, check out Building Solid Systems in F# happening 31st Jan-1st Feb 2018 in London.
Get in touch with us at us@mavnn.co.uk if you have any ideas.
]]>I really like the idea, and have taken part in 2016, 2015 & 2014.
Below is this year's post.
So; you want to find out what Christmas is about, where it really came from… but you don't have much time.
The solution is obvious: take the famous bible passages that churches read every year, and speed read them!
Let's build an app to help us with that.
Fable is a F# to JavaScript compiler, and Elmish is a library for it designed to provide a Elm/Redux style workflow around it.
If you haven't used Elm or Redux before, the basic idea is that our application will be based around three things:
These three things are all we need to manage the state of the application, but then we end up needing one final concept: subscribers.
Subscribers can take the current state, but more importantly they are passed a "dispatch" function that allows them to dispatch messages to the applications message queue. This is how we deal with all inputs in an Elmish application, whether from a user or whether it's things like network requests completing and delivering information our application needs.
The main, most important subscriber is the "view" (i.e. how we're going to show things to the user). In our app, our view will be displayed via a Fable wrapper for React, creating a single page web application. The view is nearly always capable of also dispatching messages - this is how we model things like buttons the user can click on.
You can find more about this, with pretty diagrams, on the Fable Elmish website linked above.
Let's start by setting up the application framework. We'll need dotnet core installed, and node with a reasonably recent version of yarn if you want to follow along at home.
Make yourself a new directory, and then on the command line you can run the following commands:
1
|
|
Installs the Fable template for dotnet core.
1
|
|
Creates a new Fable project in this directory, using the directory name for the project name.
1 2 |
|
Download all the basic dependencies, both for dotnet and JavaScript.
Apart from using Fable itself, we also want to make use of Elmish and it's React plugin.
Add these two libraries to paket.dependencies:
1 2 |
|
Then in the src directory add them to our Fable project as well (in paket.references):
1 2 |
|
Run a paket install to download and add the dotnet parts of the libraries to your project:
1
|
|
Then go into the "src" directory and add the JavaScript libraries that these Fable libraries depend on in the browser.
1 2 3 |
|
Let's adapt our HTML, in the "public" folder. The Fable template project assumes that we're going to be using a canvas. We're writing a text only application, so we'll just replace the canvas node with a standard div
and mark it with an id which we'll use to tell react where to render the html our code will generate.
Your index.html should end up looking like this:
1 2 3 4 5 6 7 8 9 10 11 12 13 14 15 |
|
We're going to speed read by displaying each word of the text really big in the middle of the screen one by one (so that you don't need to move your eyes to read).
Add in a index.css
file with the following to set up styles for a large centered container and a class for displaying really large text.
1 2 3 4 5 6 7 8 9 10 11 12 13 14 15 16 |
|
Fable compiles F# to JavaScript, and comes with tooling to watch your code and update it automatically.
Fire up yarn by going into your "src" directory and running:
1
|
|
This will start the fable compiler and keep it running in the background.
We've already decided we want to use Elmish with the React view. We're also going to be loading some external data so we'll want access to the Fetch API.
Let's open up all the namespaces which might be relevant:
1 2 3 4 5 6 7 8 9 10 11 12 13 14 15 |
|
Then we need a model; this holds all of the state of our app. The text to be speed read will be stored as an array of strings; we'll keep a Max
field with the index of the last word to make our logic nice and explicit, the Index
of the word currently being displayed, the number of ticks SinceLast
time we updated the word and the current number of TicksPerUpdate
.
1 2 3 4 5 6 |
|
The Msg
type represents all the ways that our app can be updated. The user can ask for the text to become faster, or slower; we can finish loading the text via a web request; and a Tick
of our timer can go past.
1 2 3 4 5 |
|
And the actual update logic takes one of those messages and a previous state, and gives us a new state:
1 2 3 4 5 6 7 8 9 10 11 12 13 14 15 16 17 18 19 20 21 22 |
|
I was feeling a bit silly, so you can make the application go "so fast it goes backwards." I mean, I've had user requirements that make less sense than that before!
Having defined our types and abstract logic, we now need to write the actual functionality of our app, working our way up to a method which starts it off with an initial state.
First some low level grunge for downloading the text we want to read.
We'll need a url and an auth token for the API we're using (esv.org provide a really nice API by the way).
1 2 3 4 5 6 7 8 9 10 11 12 13 |
|
We've split it up over multiple lines to make it readable as I'm specifying a lot of options. Nearly all of the them boil down to removing optional metadata from the text (such as verse numbers and translation footnotes). For speed reading we just want the actual words. If you want to run this application a lot, you'll need to register your application on esv.org to get your own auth token.
The text it tries to download is John 1; it's one of the most famous Christmas texts, but also very poetic in it's presentation. I love it, but if you just want "the Christmas story" try a base url of "https://api.esv.org/v3/passage/text/?q=Luke%201-Luke%202:21"
instead.
Now, some boiler plate to extract the passage from the JSON blob that esv.org send back to us. I'm totally ignoring any errors that might occur in the request here, you probably don't want to do that in a real application.
1 2 3 4 5 6 7 8 9 10 11 12 13 14 15 16 17 18 |
|
So getText
will, when passed a dispatch
function, call our Url, get the text of he body, throw away everything apart from the text of the passage we actually requested, and then split the passage on any whitespace.
We also want regular ticks
coming through and prompting us to move onto the next word (or the previous if we're going backwards…).
1 2 |
|
Next up, we need our view. The view will both receive new versions of the model as they are created, but will also receive a dispatch functions so it can feed new messages into our update
function.
1 2 3 4 5 6 7 8 9 10 11 |
|
It displays a placeholder while we're loading data, and then buttons to speed up and slow down the speed reading rate.
Finally, we can fire up our application.
1 2 3 4 5 6 7 8 9 10 11 12 |
|
We just set our initial state and then tell react which element in our html we want to render our view in. Because we are registering getText
and triggerUpdate
as subscriptions, they will be passed a dispatch
function and kicked off immediately, so the first thing our app will do is try and download the text.
Once the text is loaded, we'll start going forwards through the text, and are buttons for reading faster and slower will be displayed.
Let's see it in action:
And there we have it - I hope you'll enjoy this brief trip into writing user interfaces in F#, and your speedy recap of one of the most famous readings from the Christmas story!
1 2 3 4 5 6 7 8 9 10 11 12 13 14 15 16 17 18 19 20 21 22 23 24 25 26 27 28 29 30 31 32 33 34 35 36 37 38 39 40 41 42 43 44 45 46 47 48 49 50 51 52 53 54 55 56 57 58 59 60 61 62 63 64 65 66 67 68 69 70 71 72 73 74 75 76 77 78 79 80 81 82 83 84 85 86 87 88 89 90 91 92 93 94 95 96 97 98 99 100 101 102 103 104 105 106 107 108 109 110 111 112 |
|
(Don't worry, there's code later. Lots of code.)
It's not a complex card game; it's a quick and fun game designed to represent over the top martial arts combat in the style of Hong Kong cinema or a beat 'em up game.
Each player has a deck of cards which represent their martial art; different arts are differently weighted in their card distribution. These cards come in four main types:
A "normal" card comes in one of four suits:
They also carry a numerical value between 1 and 10, which represents both how "fast" they are and (except for defend cards) how much damage they do. A Defend card can never determine damage.
The fireballs, whirling hurricane kicks and mighty mega throws of the game. A special attack card lists two suits: one to use for the speed of the final attack, and one for the damage. This allows you to play 3 cards together to create an attack which is fast yet damaging.
A flurry of blows! Combo cards also list two suits: one for speed, and one for the "follow up" flurry. This allows you to play 3 cards together, one of which determines the speed of the attack while the other adds to the total damage. For example, if you play a Punch/Kick Combo with a Punch 3 and a Kick 7 you end up with a speed 3, damage 10 attack.
You can combine a knockdown card with any other valid play to create an action that will "knockdown" your opponent.
(This is an example of property based testing; if you need an introduction first, check out Breaking Your Code in New and Exciting Ways or the the video version)
There are of course other rules to the game; but let's assume for a moment we're coding this game up in F#. We've defined a nice domain model:
1 2 3 4 5 6 7 8 9 10 11 12 13 14 15 16 17 18 19 20 21 22 23 24 25 26 27 28 29 30 31 32 33 34 35 36 37 38 39 40 41 42 43 44 45 46 47 48 49 50 51 52 53 54 |
|
And now we want to write a function that takes the rules for playing cards above, and turns a Card list
into an Action option
(telling you if the list is a valid play, and what action will result if it is).
This function is pretty critical to the overall game play, and may well also be used for validating input in the UI so getting it right will make a big difference to the experience of playing the game.
So we're going to property test our implementation in every which way we can think of…
First step: make yourself a placeholder version of the function to reference in your tests:
1 2 3 |
|
Now, let's start adding properties. All of the rest goes in a single file, but I'm going to split it up with some commentary as we go.
1 2 3 4 5 6 7 8 9 10 11 12 13 14 15 16 17 18 19 20 21 22 23 24 25 26 27 28 29 30 31 32 33 34 35 36 37 38 39 40 41 42 |
|
We'll start off with a few general purpose bits for generating random types in our domain. I haven't gone the whole hog in making illegal states unrepresentable here, so we need to constrain a few things (like the fact that cards only have values from 1 to 10, and that you can't combo into a defend card for extra damage).
Now: let's start generating potential plays of cards. Our properties will be interested in whether a particular play is valid or invalid, and we will want to know what the resulting Action
should be for valid plays.
So we define a union to create instances of:
1 2 3 |
|
Now let's add all of the valid actions we can think of.
1 2 3 4 5 6 7 8 9 10 11 12 13 14 15 |
|
So; a normal card on it's own is always a valid play, the only thing we need to watch out for is that a Defend card causes no damage.
1 2 3 4 5 6 7 8 9 10 11 12 13 14 15 16 17 18 19 20 |
|
Here we'll generate the combo card and two other cards, and then we'll override the suit of the two normal cards to ensure they're legal to be played with the combo card.
There's a quirk here (which in reality I noticed after trying to run these tests). If the two suits are the same, the fast card should determine the speed regardless of "order".
1 2 3 4 5 6 7 8 9 10 11 12 13 14 15 16 |
|
Special attack cards have an additional constraint: playing a high value speed card with a low value damage card would actually disadvantage the player, and so is not considered a valid play.
1 2 3 4 5 6 7 8 9 10 |
|
Here we make use of the generators we've constructed above to create a Knockdown action.
1 2 3 4 5 6 7 8 9 |
|
Which allows us to write a ValidAction
generator.
Now, more interesting is trying to generate plays which are not valid. We're not trusting the UI to do any validation here, so let's just come up with everything we can think of…
1 2 3 4 5 6 |
|
More than one normal card with out another card to combine them is out.
1 2 3 4 5 6 7 8 |
|
A combo or special card always requires precisely two normal cards to be a valid play; so here, we only generate one.
1 2 |
|
A combo card can only be played as part of an otherwise valid play, and isn't allowed on it's own.
1 2 3 4 5 6 7 8 9 10 11 12 13 14 15 16 17 18 19 20 21 22 23 24 25 26 27 28 29 30 31 32 33 34 35 36 37 38 39 40 41 42 43 44 45 46 47 |
|
There's lots of ways to combine three cards which are not valid combos or specials. Here we use are allSuitsBut
helper function to always play just the wrong cards compared to what's needed.
1 2 3 4 5 6 7 8 9 10 11 12 13 14 |
|
And here we create special attacks which are slower than they are damaging. If the speed and damage suit are the same, the cards could be used either way around to create a valid action, so instead we just return the Special card on it's own without companions to form a different invalid play.
1 2 3 4 5 6 7 8 9 10 11 12 13 |
|
There's more that could be added here, but I decided that was enough to keep me going for the moment and so added my invalid action generator here.
1 2 3 4 5 6 7 8 9 10 11 12 13 14 15 16 17 18 19 20 21 22 |
|
Finally, I wired up the generators and defined the single property this function should obey: it should return the correct action for a valid play, or None
if the play is erroneous.
Hopefully this is a useful example for those of you using property based tests of how you can encode business logic into them: although this looks like a lot of code, creating even single examples of each of these cases would have been nearly as long and far less effective in testing.
It does tend to lead to a rather iterative approach to development, where as your code starts working for some of the use cases, you begin to notice errors in or missing cases you need to generate, which helps you find more edges cases in your code and round the circle you go again.
If you want, you're very welcome to take this code to use as a coding Kata - but be warned, it's not as simple a challenge as you might expect from the few paragraphs at the top of the post!
]]>TL;DR: 10% off Building Solid Systems in F# until 7th November 2017
Lots of people these days seem to like giving Halloween sales, but historically and theologically, Halloween is really just the precursor to the real celebration: All Saints' Day.
So in the interest of getting the details right, we're having an All Saints' Day sale, starting today for 7 days. It's already live, get your 10% off your tickets now.
]]>What is it? Well, I'll let the README speak for itself:
RouteMaster is a .NET library for writing stateful workflows on top of a message bus. It exists to make the implementation of long running business processes easy in event driven systems.
There is also example code in the repository so you can see what things are starting to look like.
For those of you following along, this will sound awfully familiar; that's because RouteMaster is the outcome of my decision to rebuild a Process Manager for EasyNetQ. The first cut of that was imaginatively called "EasyNetQ.ProcessManager", but I decided to rename it for three main reasons:
A pre-emptive few FAQs:
No, not yet. I'm out of time I can afford to spend on it right now, get in touch if you can/want to fund future development.
If you want to play, the code as provided does run and all of the process tests pass.
Yes, but there is a C# friendly API in the works. See the first question :)
At the moment, I'm using EasyNetQ (over RabbitMQ) and PostgreSQL (via Marten) for transport and storage respectively.
In some ways they fall in a similar space to RouteMaster, but with a different philosophy. Just as EasyNetQ is a focused library that supplies only part of the functionality you'd find in these larger solutions, RouteMaster is designed to work with your chosen transport abstraction not replace it.
I'd really like feedback, ideas, use cases and suggestions - leave comments here or ping an issue onto the repository. If you're feeling really brave and can try and actually experiment with it, but at the moment I'm mostly hoping for concrete use cases and, well, funding.
Quite a few people over the years have hit my website searching for an EasyNetQ process manager, and others have asked me if it's still available. I'd like to hear from as many of you as possible to build the tightest, simplest solution which will do the job.
]]>So here's a minimal implementation of a "microservice" Freya API, starting from which dotnet commands to run to install the Freya template, through to a running web service.
Make sure you have an up to date .NET Core SDK installed, and grab yourself the handy dandy Freya template:
1
|
|
Then create yourself a directory and go into it. The following command will set up a brand new Freya project using kestrel as the underlying webserver, and Hopac (rather than F# Async) for concurrency. Alternatively, you can leave both the options off and you'll get Freya running on Suave with standard Async.
1
|
|
Your project should run at this point; dotnet run
will spin up a webserver on port 5000 which will give a 404 at the root and text responses on /hello and /hello/name paths.
Api.fs is where all the magic of configuring Freya happens - KestrelInterop.fs contains boilerplate for making sure Routing information passes correctly between Kestrel and Freya, and Program.fs just starts Kestrel with our Freya API as an OWIN app.
So, this is great and all, but we're building a microservice aren't we? That normally means JSON (or at least something more structured than plain text!).
Let's change things up so that as well as supplying the name to greet in the route, we can POST JSON with a name field to the /hello end point.
To respond in JSON, we need a Freya Represent
record. We're sending a result with a fixed structure, so we don't need a serialization library or anything, we'll just construct the JSON by hand. Stick this near the top of Api.fs:
1 2 3 4 5 6 7 8 9 10 11 12 13 14 15 16 17 18 19 |
|
So here we're defining an HTTP representation of a response, including media type and other important information.
Aside: why do we return a lambda at the end rather than making representGreeting itself a function? That's so that we don't want to rebuild the two byte arrays and the regex every time we call the function.
We also need to be able to read incoming JSON. Well, all we want is a string so lets just check that there's an '"' at the beginning and end…
1 2 3 4 5 6 7 8 |
|
Now we can start hooking up the actual root that we want. We need to make some additions to helloMachine
:
1 2 3 4 5 6 |
|
Magically our endpoint now knows not only that we accept POSTs, but it will end the correct error code if the media type of the POST is not set to JSON.
We also need to update sayHello
and name
; we'll extract the method of the request and choose logic for working out the name and creating the response respectively.
1 2 3 4 5 6 7 8 9 10 11 12 13 14 15 16 17 18 19 20 21 22 23 24 25 26 |
|
And that's everything we should need. Firing up PostMan we can find out that posting an empty body gets a 500 (we should probably handle that, looks like the request stream can be null), firing in a string with no media type header gets back a "415 Unsupported Media Type" (did you know that off hand?) and a POST with a correct body (i.e., starts and ends with a '"') gets us back:
1
|
|
So there you have it. Adding a POST endpoint to Freya.
Here is the complete Api.fs for you to follow along, with open statements moved to the top of the file:
1 2 3 4 5 6 7 8 9 10 11 12 13 14 15 16 17 18 19 20 21 22 23 24 25 26 27 28 29 30 31 32 33 34 35 36 37 38 39 40 41 42 43 44 45 46 47 48 49 50 51 52 53 54 55 56 57 58 59 60 61 62 63 64 65 66 67 68 69 70 71 72 73 74 75 76 77 78 |
|
It's alive! The process manager code I've been reconstructing (see Intro and the in memory test bus) is slowly starting to take some shape.
As you can see, it comes with nice (no dependency) logging out of the box and it is async all the way down to the underlying transport.
This is still at the underlying plumbing phase in many ways: the code to construct a workflow like this is currently a boilerplate covered ugly mess - but it's all boilerplate which has been deliberately designed to allow powerful APIs to be built over the top.
Next up: a nice sleek API for creating "pipeline" workflows more easily. Then the real fun starts - pleasant to use abstractions over fork/join semantics…
Interested in seeing faster progress on this project? Drop us@mavnn.co.uk a line to talk sponsorship.
]]>